
Github Actions自动更新云服务器项目
# 概述
# 流水式
传统写MD文章,然后提交到Github并本地执行build打包完上传到云服务器
# 自动化
新建gh-pages分支,配合pages.github.io和Github Actions
触发push到master主分支的行为就执行.github/workflows/*.yml下的文件.而达到自动化打包更新
# 加快网络访问
毕竟是国外的网络,对于国内访问非常卡😨,于是此篇文章的目是
只要master有更新😀便同步执行云服务器的shell脚本更新😍.生成最新的文章页面💪
@flowstart process=>operation: master有push更新 process2=>operation: 触发Github Actions process3=>operation: 打包并部署到gh-pages分支 process4=>operation: SSH远程登录云服务器git pull(gh-pages分支) e=>end: End
process->process2 process2->process3 process3->process4 process4->e @flowend
# 准备
# 切换 NPM 镜像源
npm install -g nrm

/**
  npm ---- https://registry.npmjs.org/
  cnpm --- http://r.cnpmjs.org/
  taobao - http://registry.npm.taobao.org/
  eu ----- http://registry.npmjs.eu/
  au ----- http://registry.npmjs.org.au/
  sl ----- http://npm.strongloop.com/
  nj ----- https://registry.nodejitsu.com/
**/


#切换到taobao
nrm use taobao
2
3
4
5
6
7
8
9
10
11
12
13
14
15
# 选用开源项目并部署
本文采用此开源项目:vuepress-theme-reco (opens new window)
Pages 自定义域名 (opens new window)
使用 GitHub Actions 自动部署博客 (opens new window)
# 开始部署
按照以上的教程链接就能成功.
如果还有不懂的就看下我的github:xzwiao.github.io (opens new window)
里面有两个分支master(主分支.放源码)和gh-pages(存放build编译后的包)
# ${home}/.github/workflows/main.yml
name: Deploy GitHub Pages

# 触发条件:在 push 到 master 分支后
on:
  push:
    branches:
      - master

# 任务
jobs:
  build-and-deploy:
    # 服务器环境:最新版 Ubuntu
    runs-on: ubuntu-latest
    steps:
      # 拉取代码
      - name: Checkout
        uses: actions/checkout@v2
        with:
          persist-credentials: false

      # 生成静态文件
      - name: Build
        run: npm install && npm run build

      # 部署到 GitHub Pages
      - name: Deploy
        uses: JamesIves/github-pages-deploy-action@releases/v3
        with:
          ACCESS_TOKEN: ${{ secrets.ACCESS_TOKEN }}
          BRANCH: gh-pages
          FOLDER: dist
2
3
4
5
6
7
8
9
10
11
12
13
14
15
16
17
18
19
20
21
22
23
24
25
26
27
28
29
30
31
32
# github Actions自动触发服务器更新
由于github.io的服务器是在国外.并且并发量比较大,导致带宽的严重缓慢
于是便有了部署到个人的阿里云服务器上的想法\
# 生成RSA公私匙
这里推荐码云的教程:生成/添加SSH公钥 (opens new window)
TIP:记得在云服务器上操作
# 添加公匙到Github
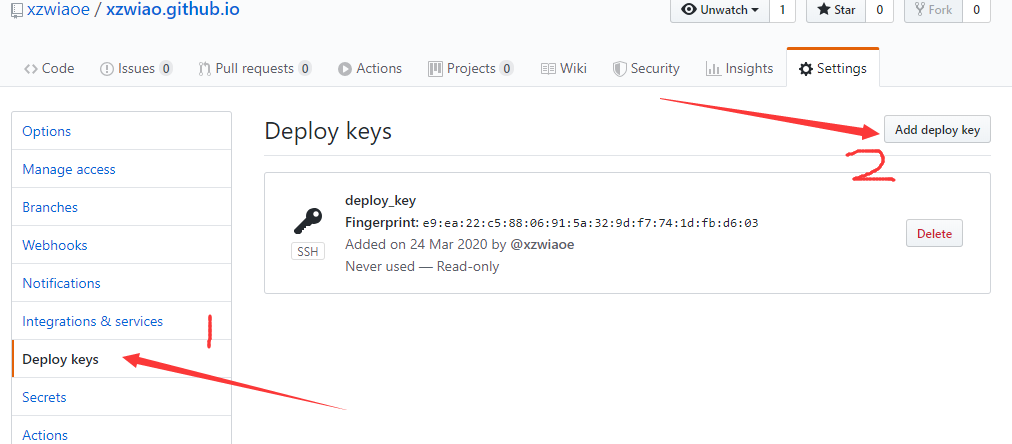
把在云服务生成的id_rsa.pub添加到settings->Deploy Keys中(如下图)
#克隆项目到云服务器
git clone https://github.com/xzwiaoe/xzwiao.github.io.git
#切换到分支gh-pages(记得cd到项目根目录)
git checkout gh-pages
2
3
4
# 编写shell VS nginx.conf
#deploy_blog.sh

#!/bin/bash
#去到目录
cd /home/blog

#更新最新代码
git pull
2
3
4
5
6
7
8
记得赋予deploy.sh执行权限(chmod命令)
配置https请先自行百度.晚点把教程补上
#nginx.conf

#重定向到https
server {
    listen       80;
    server_name  fumeck.com www.fumeck.com;
	rewrite ^/(.*)$ https://www.fumeck.com/$1 permanent;
}

#开启https
server {
	listen 443;
	server_name www.fumeck.com;
	ssl on;
	root html;
	index index.html index.htm;
	ssl_certificate   cert/3652143_www.fumeck.com.pem;
	ssl_certificate_key  cert/3652143_www.fumeck.com.key;
	ssl_session_timeout 5m;
	ssl_ciphers ECDHE-RSA-AES128-GCM-SHA256:ECDHE:ECDH:AES:HIGH:!NULL:!aNULL:!MD5:!ADH:!RC4;
	ssl_protocols TLSv1 TLSv1.1 TLSv1.2;
	ssl_prefer_server_ciphers on;

	location /{
		root   /home/blog;
        index  index.html;
    }
}
2
3
4
5
6
7
8
9
10
11
12
13
14
15
16
17
18
19
20
21
22
23
24
25
26
27
28
# 云服务器允许SSH远程登录
到目前为止,网站已能访问,但还不够自动化
每次发布文章还得手动的执行deploy_blog.sh脚本.
所以这里还差两歩:
- 1.云服务器允许SSH远程登录
- 2.Github Actions触发远程更新
登录阿里云控制台 (opens new window),云服务器ECS->网络与安全->密匙对
创建密匙对并绑定到对应的ECS实例中,然后重启实例
实例就只允许使用RSA密匙的方式登录(旧的密码方式失效)
以下为客户端访问远程服务器测试
#此时有需要RSA密匙对.可以重用之前的
#远程服务器放置公匙(已在阿里云密匙对中添加并绑定)
#客户端放置私匙
ssh-add ~/.ssh/id_rsa
#默认端口是22.其他端口得加 -p 端口号
ssh-keyscan -t rsa 47.106.96.91
2
3
4
5
6
# 出Bug了
#执行ssh
ssh -o StrictHostKeyChecking=no -i ~./ssh/id_rsa -A -tt -p 22506 39.108.175.238 ls
#报如下错误.去掉 -i ~./ssh/id_rsa就不会
tilde_expand_filename: No such user .
2
3
4
这个暂时找不到原因,Github Actions不会有这个问题,所以先略过
以下是部署方式
 deploy-on-aliyun:
    needs: build-and-deploy
    # 服务器环境:最新版 Ubuntu
    runs-on: ubuntu-latest
    steps:
      - name: Setup git file
        env:
          ACTIONS_DEPLOY_KEY: ${{ secrets.deploy_key }}
        run: |
          SSH_PATH="~/.ssh"
          mkdir -p $SSH_PATH
          touch "$SSH_PATH/known_hosts"
          echo "$ACTIONS_DEPLOY_KEY" > "$SSH_PATH/id_rsa"
          chmod 700 "$SSH_PATH"
          chmod 600 "$SSH_PATH/known_hosts"
          chmod 600 "$SSH_PATH/id_rsa"
          echo "file addad"
      - name: Setup git excute
        env:
          USER: root
          HOST: 39.108.175.238
          PORT: 22506
        run: |
          SSH_PATH="~/.ssh"
          eval $(ssh-agent)
          ssh-add "$SSH_PATH/id_rsa"
          ssh-keyscan -t rsa -p $PORT $HOST >> "$SSH_PATH/known_hosts"
          ssh -o StrictHostKeyChecking=no -i $SSH_PATH/id_rsa -A -tt -p $PORT $USER@$HOST ./deploy_blog.sh
2
3
4
5
6
7
8
9
10
11
12
13
14
15
16
17
18
19
20
21
22
23
24
25
26
27
28
# 参考文献
通过GitHub actions发布hugo到私有云服务器 (opens new window)
阮一峰:
SSH原理与运用(一):远程登录 (opens new window)
SSH原理与运用(二):远程操作与端口转发 (opens new window)